Lesson 37: Audio Files
Often, embedding music from a website like SoundCloud (as was done in the previous lesson) is not a sufficient solution. Many times you will want to include audio files (e.g. mp3, wav) in your project so that you have contol over when they start and end. Usually, it is best to create your own background music and sound effects so that you can customize it exactly how you want for the intended purpose. However, if this is not a feasible solution for your project, there are many music and sound effect libraries that provide audio files for download for a price, and sometimes for free. Here are a few you might be interested in:
- soundjay.com
- soundsnap.com (Free for CSUN CTVA students: contact your instructor for login information.)
- soundofpicture.com (give credit for a non-profit or non-paid piece)
Collaborating with others is often very useful in creating game content. For students taking this as part of the ctva468 course, you will have opportunities to meet with composition students from the music department to create a track that fits your game perfectly.
It's time to add some audio files to your project!
1. Download the Audio Files and place them with your project files as shown below.

The BigPoppa.mp3 file was one of the music files from the soundofpicture.com music library.
You need an mp3 and a wav for each sound you use to ensure the sound will work on all browsers. BigPoppa.wav was created from BigPoppa.mp3 using software that converts mp3 files to wav files. If you are a MAC user, see instructions for converting audio files with iTunes. For PC users, there are free plugins for Windows Media Player that will allow you to convert audio files. Also, a quick Google search for "free audio file converters" will provide you with many PC and MAC software options for doing this.
The other audio files were taken from soundsnap.com. These audio files were provided in both mp3 and wav format so there was no conversion needed.
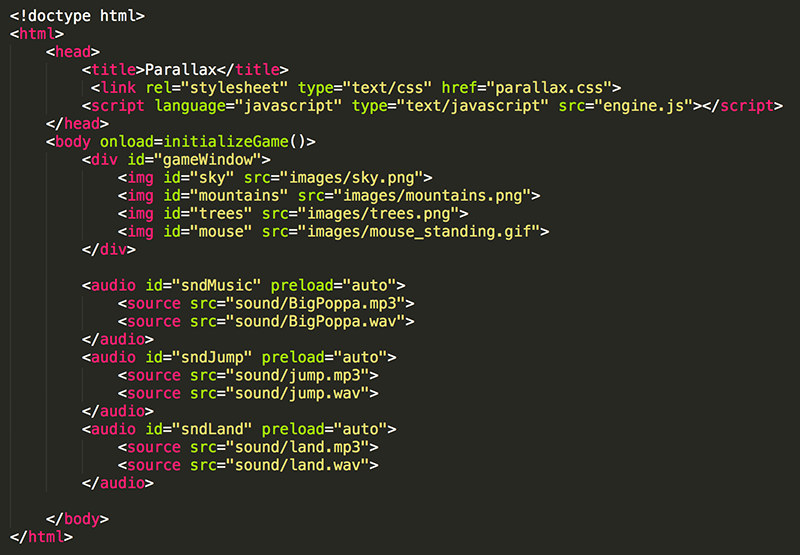
2. Add the audio elements to the HTML.

Both an mp3 and wav source is needed to ensure that the sounds will play in all browsers. Setting the preload attribute to auto tells the browser to load the entire audio file when the page loads.
Of course you could keep each audio element on a single line if you want to.

3. In your JavaScript, add the code to play sndJump (the jump sound) into the jump() function.

Every time the mouse jumps, you should now hear the jump sound. Make sure your computer volume is turned up!
Note that play() is a method (a function of an object) of the audio element.
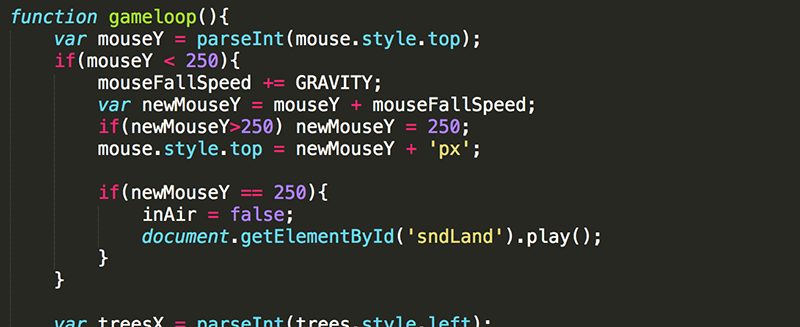
4. Add the code into the gameloop() function to play sndLand at the moment the mouse lands back on the ground.

Now you should hear the jump sound at the beginning of a jump and the land sound at the end of the jump.
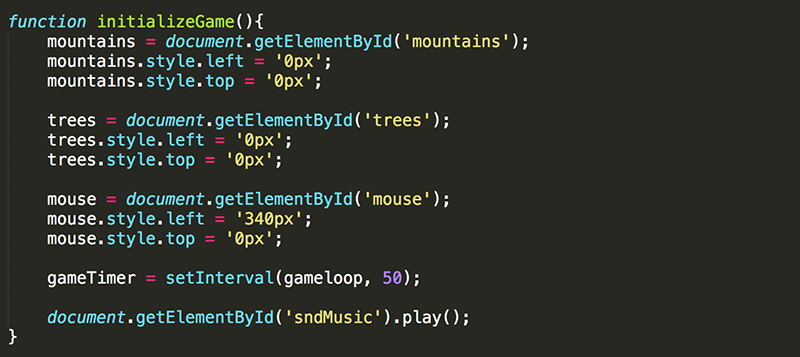
5. Add the code to play sndMusic. This belongs in the init() function, so that it begins to play as soon as the page is loaded.

The music should now begin playing in the background when the page loads. You may notice that the music is quite loud (in comparison to the other sounds). You will fix this in a moment.
6. Modify this code to use a local variable (also named sndMusic).

Remember, you typically do this if you are going to be using the element multiple times.
7. Add code to reduce the volume of sndMusic to 10% (0.1).

All may seem perfect now... but if you play long enough, eventually the music ends. That is sad... you don't want your game music to end abruptly while the game is still being played.
8. Set the sndMusic loop property to true so that the music continues to repeat forever.

In this case, you can hear when the song restarts. Some music files are seamless--they are created so that the end of the music smoothly flows into the beginning of the music.
Just as you can use the play() method to play an audio file, you can use the pause() method to pause an audio file. That may come in handy if you want the music to stop at a particular point in the game.